iOS SDK
This guide provides instructions on integrating Authany with an iOS app.
The Authany iOS SDK supports iOS 11.0 and higher. This tutorial builds the demo app with Apple's Observation framework (@Observable) and Swift Concurrency (async/await), which require iOS 17.0 or higher, Xcode 16 or later, and the Swift 6 language mode. If you need to support older iOS versions, you can apply the same structure using ObservableObject and the SDK's completion handlers instead.
Follow this guide to add Authany to your iOS app in 🕐 10 minutes.
Note
You can find the full code for the demo app for this tutorial in this Github repo
Setup Application in Authany
Sign up for an Authany Portal account at https://manage.authany.com/. Or you can use your self-deployed Authany.
From the Project listing, create a new Project or select an existing Project. After that, we will need to create an Authany client application in the project.
Step 1: Create an application in the Portal
Go to Applications on the left menu bar.
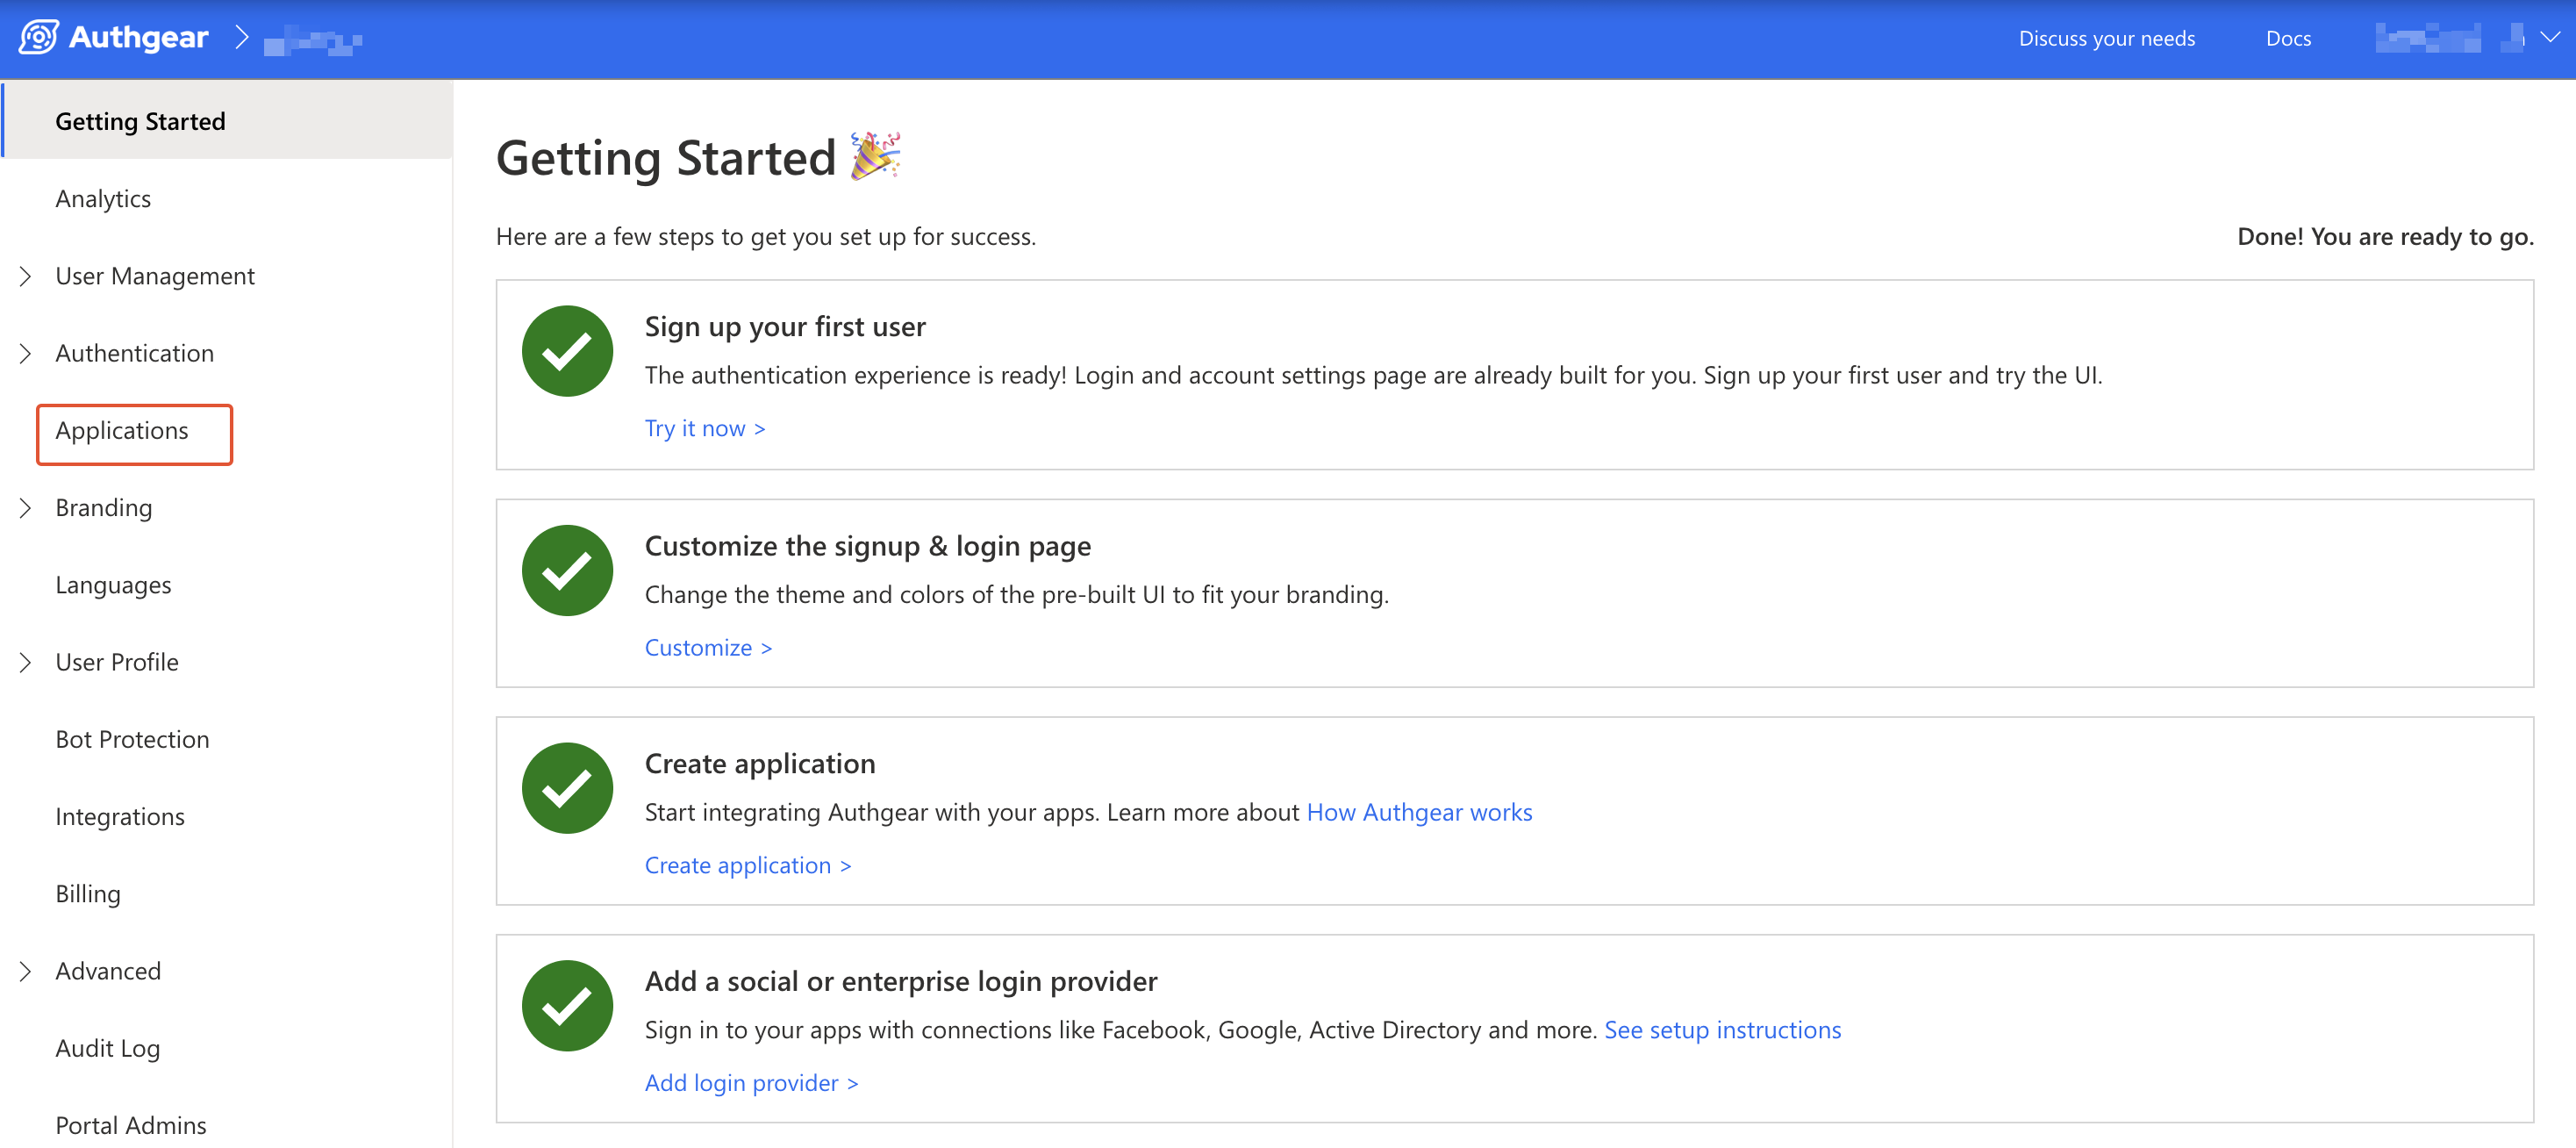
Click ⊕Add Application in the top toolbar.
Input the name of your application and select Native App as the application type. Click "Save".
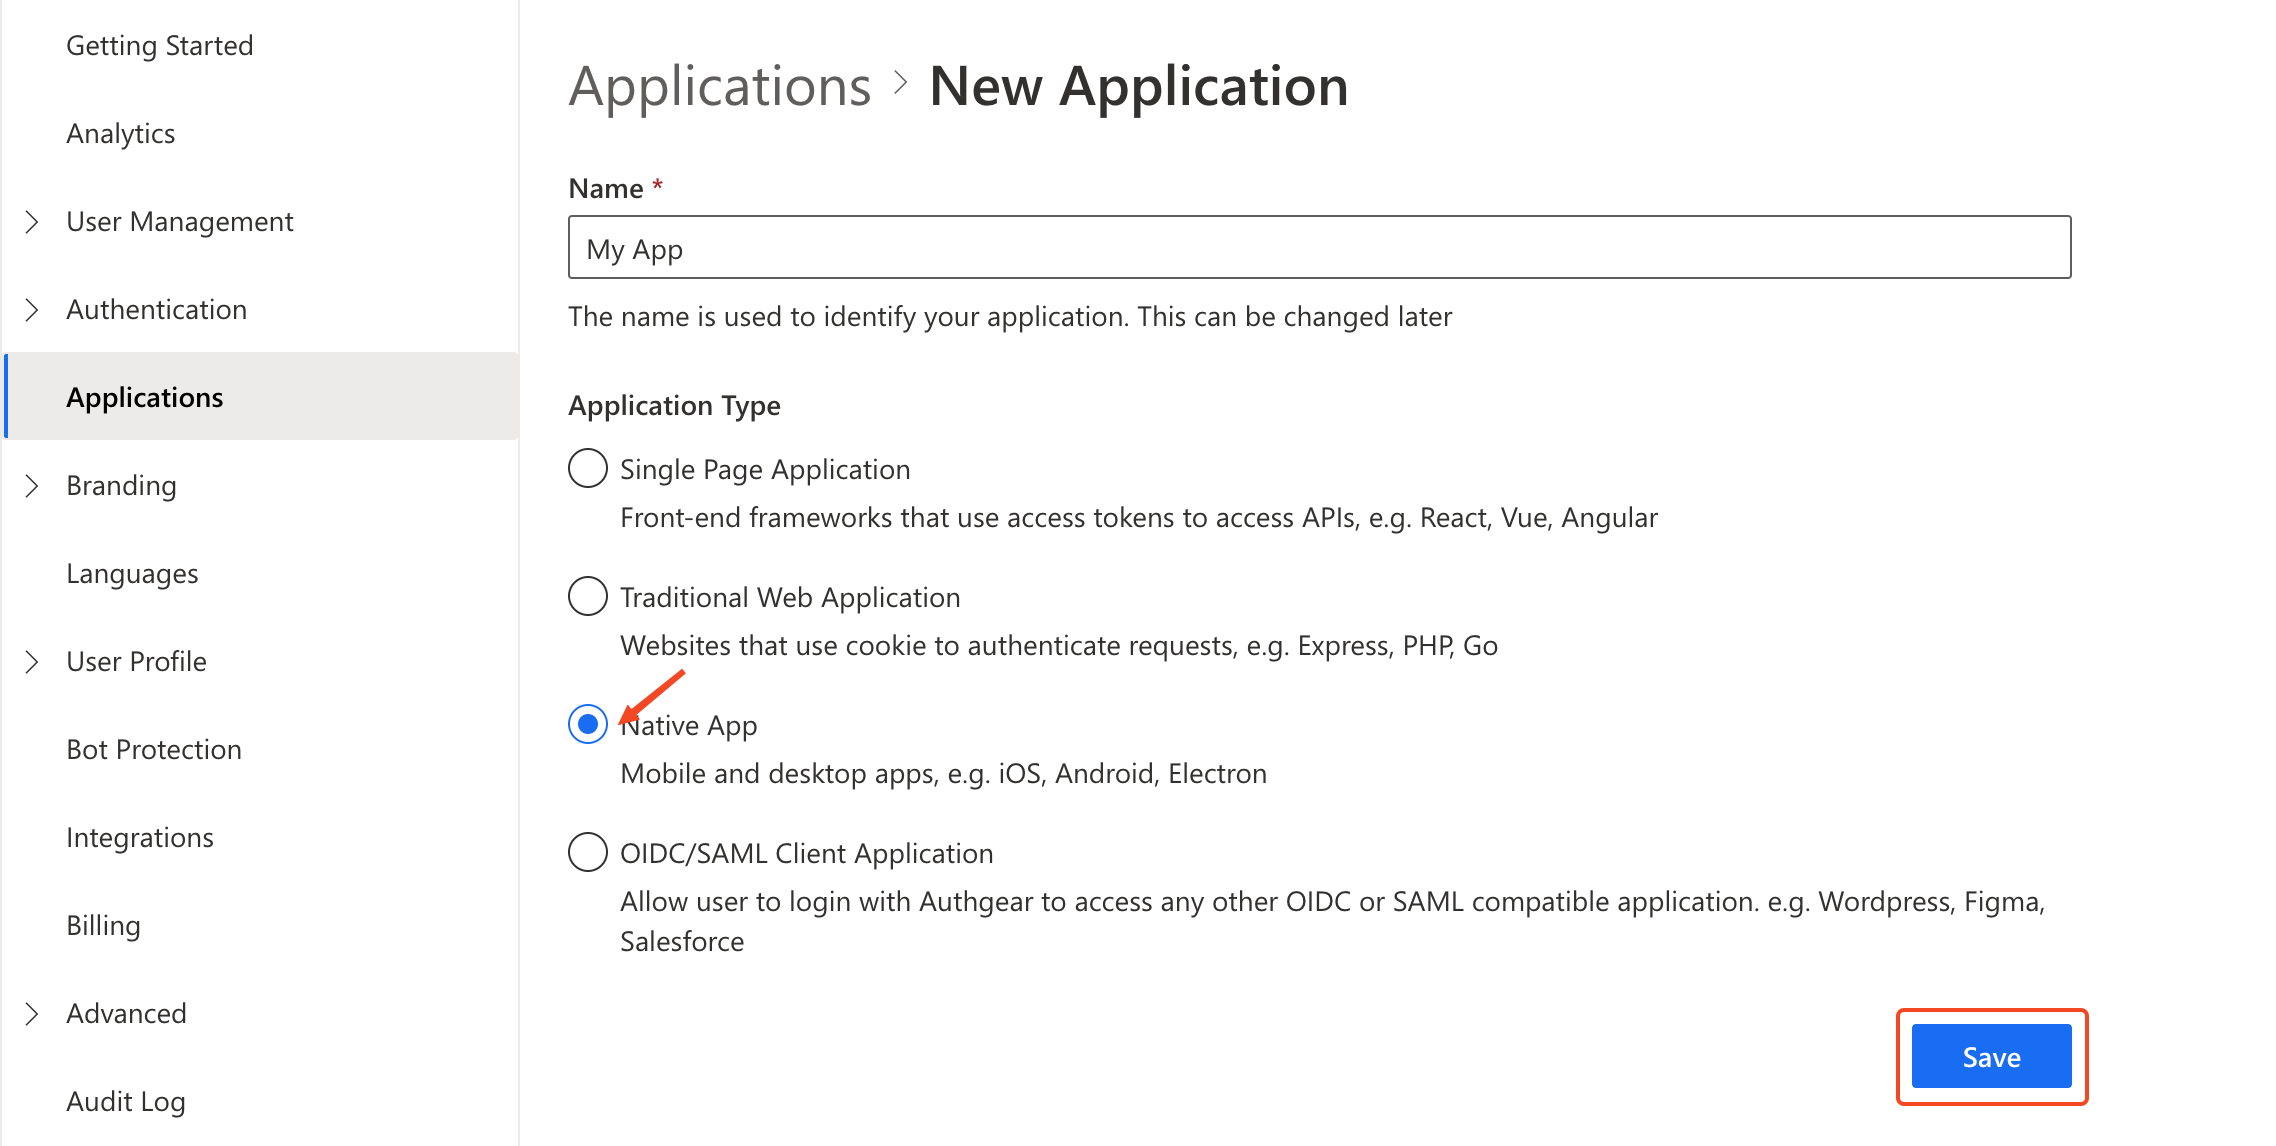
You will see a list of guides that can help you for setting up, then click "Next".
Step 2: Configure the application
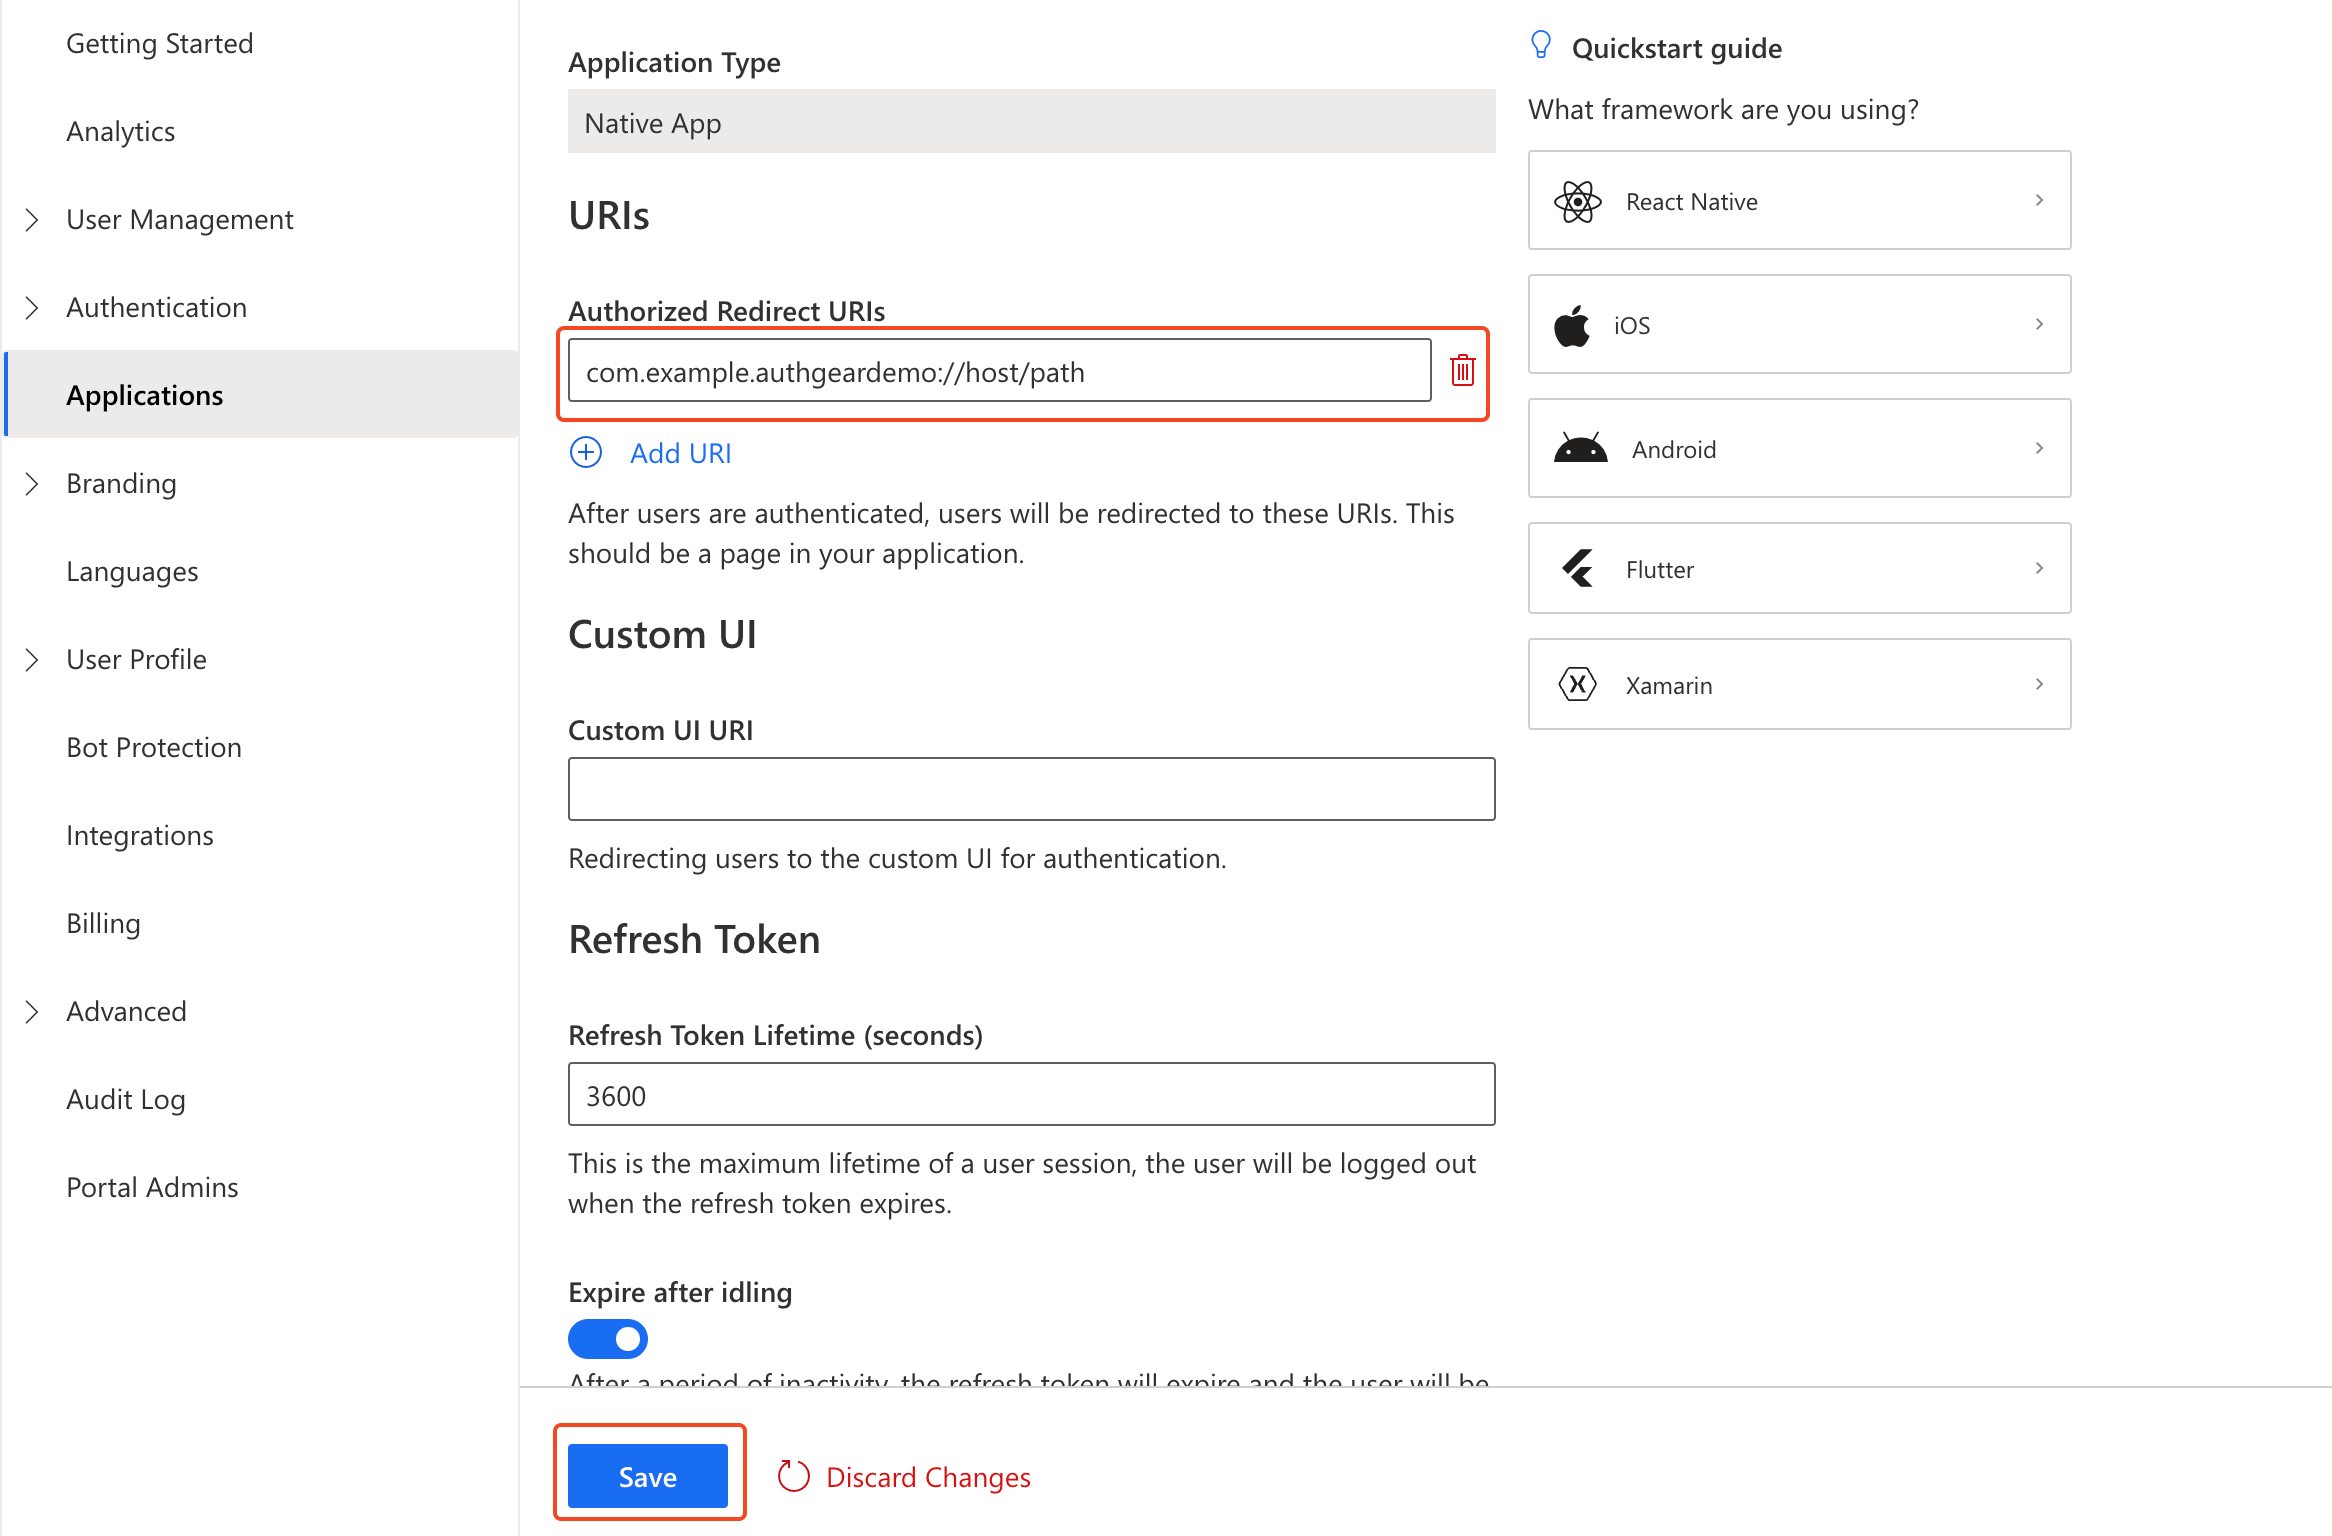
Here you'll need to define a custom URI scheme that Authany will use to redirect users back to your app after authentication. For our example app, the custom URL scheme is com.example.authgeardemo, and the full Redirect URI built on top of it is com.example.authgeardemo://host/path. For further instructions on setting up a custom URI scheme in iOS, see the official documentation here.
Head back to Authany Portal, and add com.example.authgeardemo://host/path as Redirect URI.
Click "Save" button and note the Client ID. and Endpoint for your new client application as you'll use them later in your iOS application. You can also obtain the Client ID again from the Applications list later.
Add Authany to your iOS Application
In this step, we'll add user authentication to a simple iOS app using the Authany iOS SDK and the client application we created in the previous steps.
Pre-requisites
To follow the steps in this guide seamlessly, you should have the following:
- Xcode 16 or later
- A project targeting iOS 17.0 or later, using the Swift 6 language mode
- Some knowledge of SwiftUI and Swift Concurrency (
async/await)
Step 1: Create new iOS project
For the purpose of this guide, we'll create a new project in Xcode. Skip this step if you're adding Authany to your existing app.
To create a new project, open Xcode and navigate to File > New > Project. Create your new project with the following details:
- Project Name:
my_demo_app - choose
SwiftUIas Interface Leave other fields unchanged and proceed to create the project.
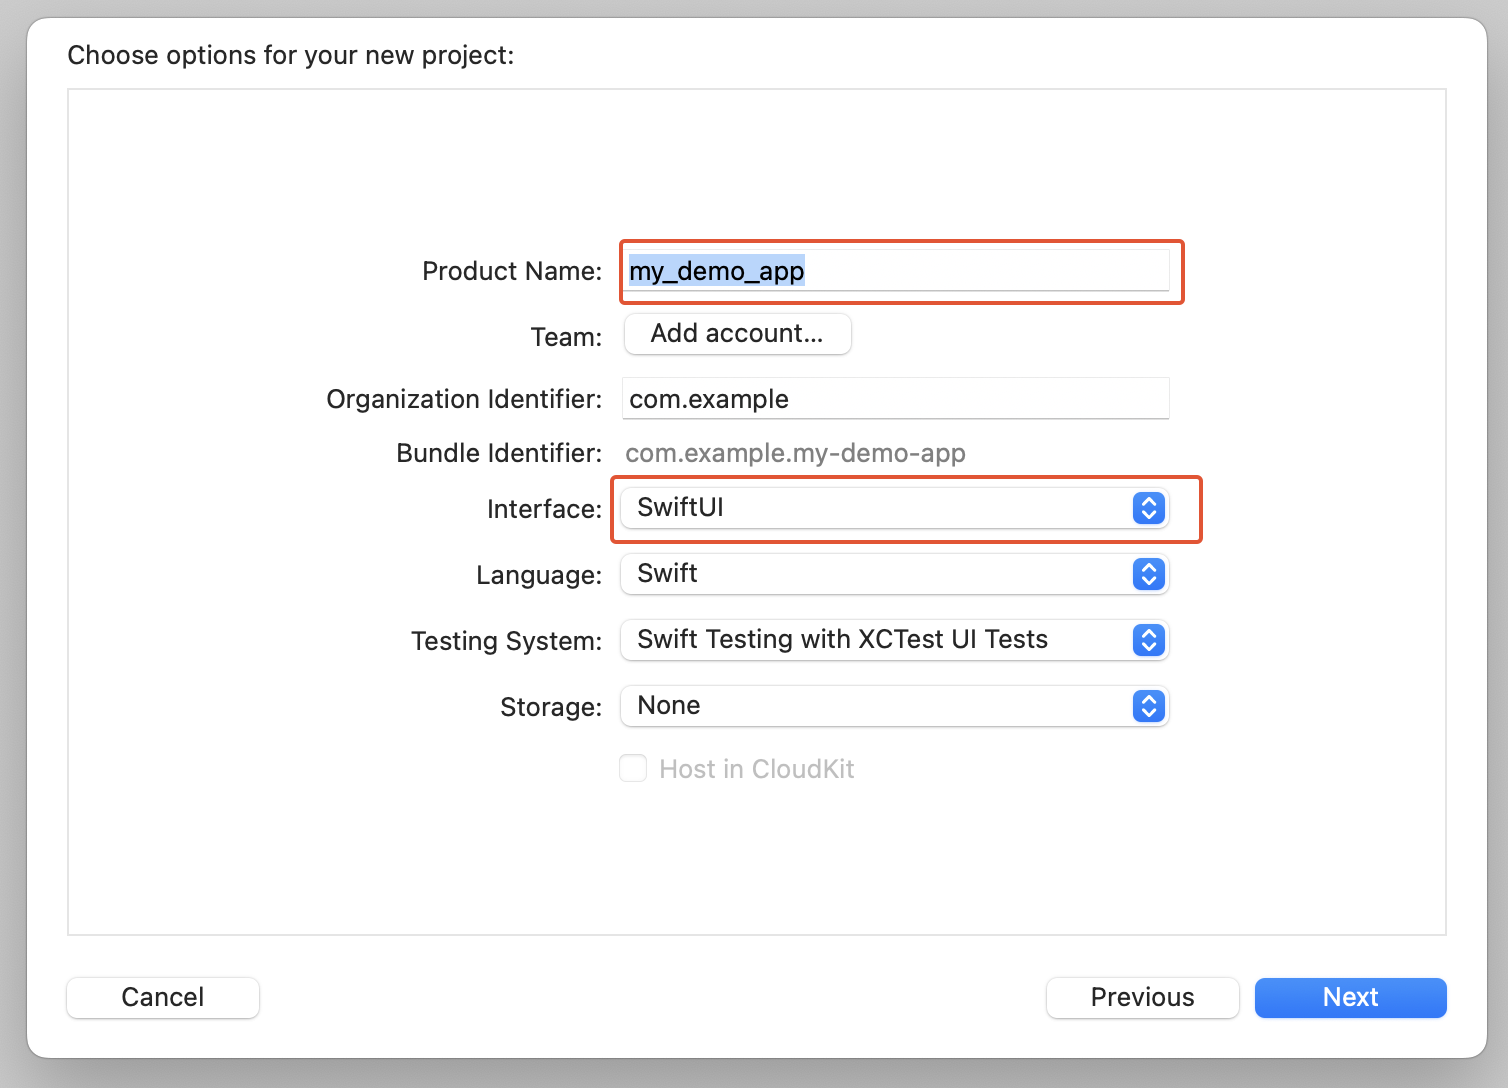
Xcode new project
Step 2: Install Authany SDK
The Authany iOS SDK makes it easy to interact with Authany services from your iOS project.
To add Authany SDK to your project, in Xcode navigate to File > Add Package Dependencies and enter https://github.com/authgear/authgear-sdk-ios.git in the Package URL text field. Select the Up to Next Major Version dependency rule starting from 2.0.0.
Click Add Package to proceed.
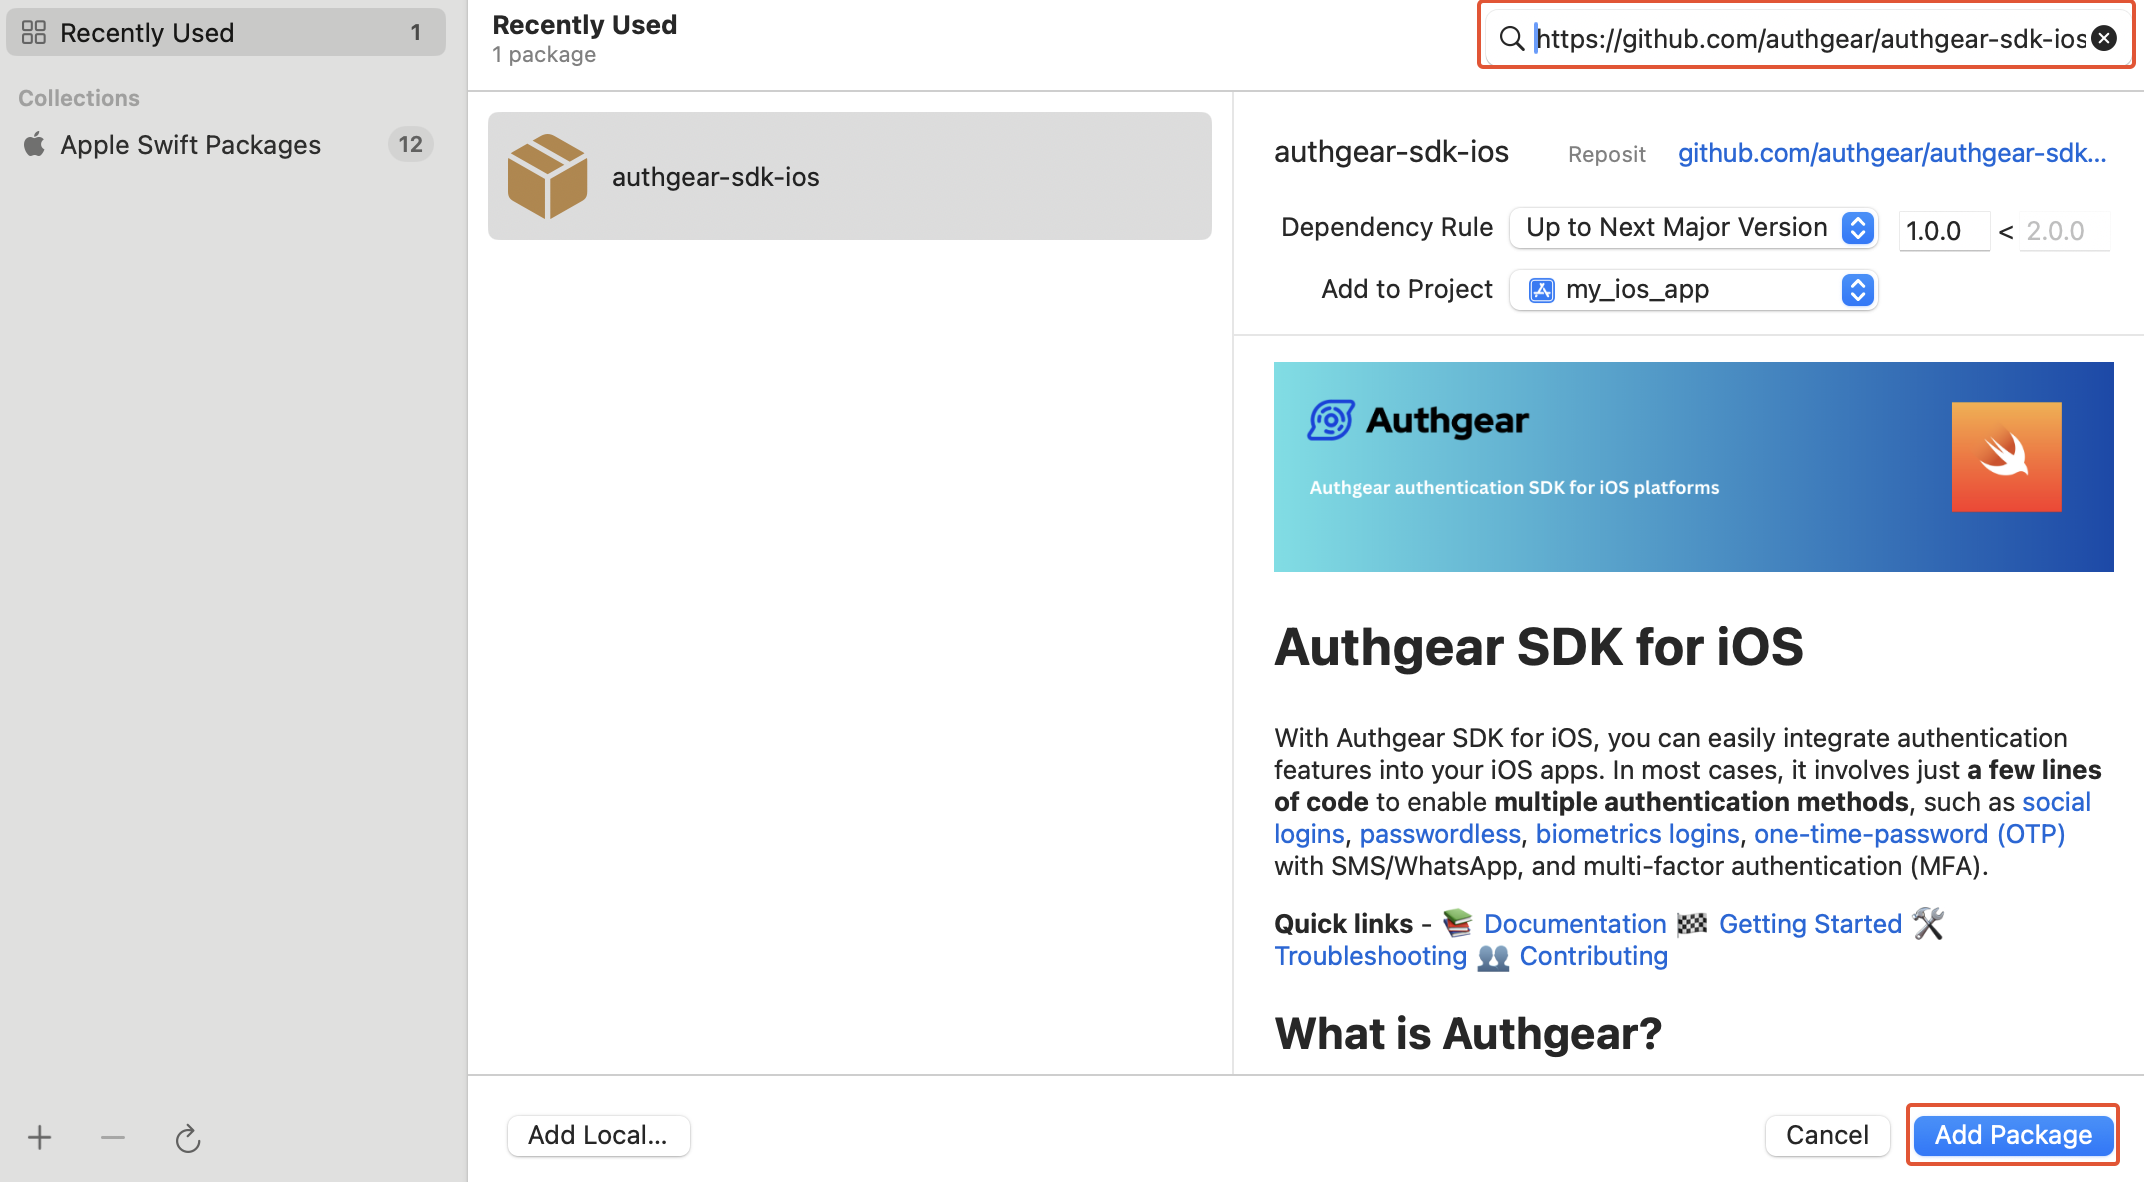
Xcode package manager
On the next screen, select your application under Add to Target then click on Add Package.
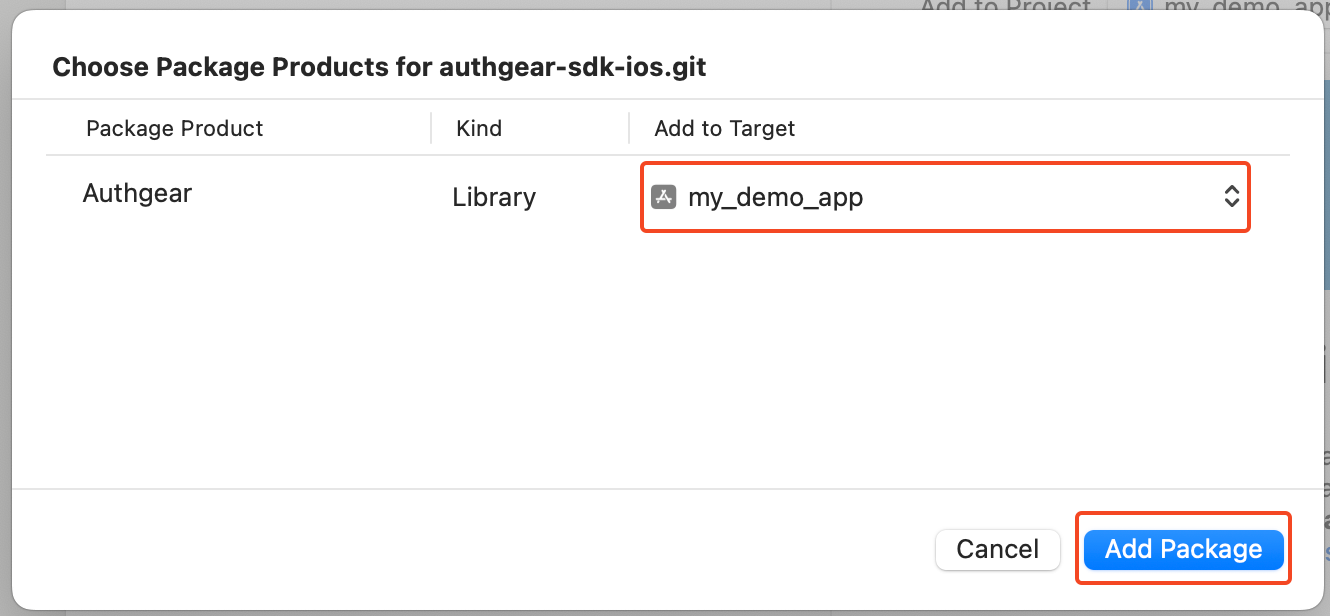
xcode add package
Alternatively, if your project uses cocoapods, install the SDK using:
Step 3: Create the authentication model
We'll keep all authentication logic in one place — an @Observable model that owns a single Authgear instance and exposes a small, UI-friendly state. The view (next step) just renders that state and calls the model's methods.
Create a new Swift file named AuthenticationModel.swift and add the following:
//  AuthenticationModel.swift

import Authgear
import Observation

// Sendable snapshots produced *inside* the SDK's completion handlers so that
// no non-Sendable Authgear type crosses the `await` boundary.
private enum AuthOutcome: Sendable {
    case signedIn(userID: String)
    case cancelled
    case failed(message: String)
}

private enum VoidOutcome: Sendable {
    case ok
    case failed(message: String)
}

@MainActor
@Observable
final class AuthenticationModel {
    enum State: Equatable {
        case loading
        case signedOut
        case signedIn(userID: String)
    }

    private(set) var state: State = .loading

    // Non-nil drives an error alert in the view.
    var errorMessage: String?

    private let authgear: Authgear
    private var didConfigure = false

    init() {
        authgear = Authgear(
            clientId: "<CLIENT_ID>",
            endpoint: "<AUTHGEAR_ENDPOINT>"
        )
    }

    // Configure the SDK once and restore any existing session.
    func configure() async {
        guard !didConfigure else { return }
        didConfigure = true

        let outcome: VoidOutcome = await withCheckedContinuation { continuation in
            authgear.configure { result in
                switch result {
                case .success:
                    continuation.resume(returning: .ok)
                case let .failure(error):
                    continuation.resume(returning: .failed(message: error.localizedDescription))
                }
            }
        }

        switch outcome {
        case .ok:
            // Refresh the session if the user has an existing one.
            if authgear.sessionState == .authenticated {
                await refreshCurrentUser()
            } else {
                state = .signedOut
            }
        case let .failed(message):
            errorMessage = message
            state = .signedOut
        }
    }

    // Start the interactive login flow.
    func logIn() async {
        state = .loading

        let outcome: AuthOutcome = await withCheckedContinuation { continuation in
            authgear.authenticate(redirectURI: "com.example.authgeardemo://host/path") { result in
                switch result {
                case let .success(userInfo):
                    continuation.resume(returning: .signedIn(userID: userInfo.sub))
                case let .failure(error):
                    if let authgearError = error as? AuthgearError,
                       case .cancel = authgearError {
                        continuation.resume(returning: .cancelled)
                    } else {
                        continuation.resume(returning: .failed(message: error.localizedDescription))
                    }
                }
            }
        }

        apply(outcome)
    }

    // Log out and clear the local session.
    func logOut() async {
        state = .loading

        let outcome: VoidOutcome = await withCheckedContinuation { continuation in
            authgear.logout { result in
                switch result {
                case .success:
                    continuation.resume(returning: .ok)
                case let .failure(error):
                    continuation.resume(returning: .failed(message: error.localizedDescription))
                }
            }
        }

        switch outcome {
        case .ok:
            state = .signedOut
        case let .failed(message):
            errorMessage = message
            // The SDK's session state is authoritative after a failed logout.
            if authgear.sessionState == .authenticated {
                await refreshCurrentUser()
            } else {
                state = .signedOut
            }
        }
    }

    // Open the pre-built user settings page.
    func openUserSettings() {
        authgear.open(page: .settings)
    }

    // Refresh the signed-in user's info; downgrades to signed-out if the
    // refresh token is no longer valid.
    private func refreshCurrentUser() async {
        let outcome: AuthOutcome = await withCheckedContinuation { continuation in
            authgear.fetchUserInfo { result in
                switch result {
                case let .success(userInfo):
                    continuation.resume(returning: .signedIn(userID: userInfo.sub))
                case let .failure(error):
                    continuation.resume(returning: .failed(message: error.localizedDescription))
                }
            }
        }

        apply(outcome)
    }

    private func apply(_ outcome: AuthOutcome) {
        switch outcome {
        case let .signedIn(userID):
            state = .signedIn(userID: userID)
        case .cancelled:
            state = .signedOut
        case let .failed(message):
            errorMessage = message
            state = .signedOut
        }
    }
}
Replace "<CLIENT_ID>" and "<AUTHANY_ENDPOINT>" with the client ID and endpoint from the configuration page of the client project you created earlier.
Note
Why the AuthOutcome / VoidOutcome enums? The Authany SDK ships completion-handler APIs, and its result types (UserInfo, SessionState, AuthgearError) are not Sendable. To stay clean under the Swift 6 language mode, each call is wrapped with withCheckedContinuation, and the completion closure captures only the continuation and resumes with a small Sendable value extracted inside the closure. That way no non-Sendable SDK type crosses the await boundary, so the model compiles under strict concurrency checking without extra annotations.
In the demo app repo, the client ID, endpoint, and redirect URI are factored into a small Constants.swift enum instead of being hard-coded in the initializer — a good pattern for real projects.
Here's what each method does:
configure()— initializes the SDK once (guarded bydidConfigure) and, if a previous session exists, refreshes it so returning users land straight on the signed-in screen.logIn()— runs the interactive authentication flow. User cancellation is handled distinctly from real errors, so cancelling the login sheet doesn't raise an error alert.logOut()— ends the current session. On failure it treats the SDK'ssessionStateas authoritative rather than assuming the user is signed out.openUserSettings()— opens Authany's pre-built User Settings page, where users can view and modify their profile attributes and security settings.refreshCurrentUser()— callsfetchUserInfoto updatesessionStateand retrieve the user'ssub(a unique user ID). This also detects a session that has been revoked remotely:sessionStatebecomes.noSessionand the model drops back to signed-out.
Step 4: Build the ContentView
Now replace the contents of ContentView.swift with a state-driven view that observes the model. It triggers configure() from .task when the view first appears, wraps the async actions in Task {}, and surfaces any errorMessage with an .alert:
//  ContentView.swift

import SwiftUI

struct ContentView: View {
    @State private var model = AuthenticationModel()

    var body: some View {
        VStack(spacing: 16) {
            switch model.state {
            case .loading:
                ProgressView()
            case .signedOut:
                signedOutView
            case let .signedIn(userID):
                signedInView(userID: userID)
            }
        }
        .padding()
        .task {
            await model.configure()
        }
        .alert(
            "Something went wrong",
            isPresented: Binding(
                get: { model.errorMessage != nil },
                set: { isPresented in
                    if !isPresented { model.errorMessage = nil }
                }
            ),
            presenting: model.errorMessage
        ) { _ in
            Button("OK", role: .cancel) {}
        } message: { message in
            Text(message)
        }
    }

    private var signedOutView: some View {
        VStack(spacing: 16) {
            Image(systemName: "globe")
                .imageScale(.large)
                .foregroundStyle(.tint)
            Text("My Demo App")
            Button("Login") {
                Task { await model.logIn() }
            }
        }
    }

    private func signedInView(userID: String) -> some View {
        VStack(spacing: 16) {
            Text("Welcome user \(userID)")
            Button("User Settings") {
                model.openUserSettings()
            }
            Button("Logout") {
                Task { await model.logOut() }
            }
        }
    }
}

#Preview {
    ContentView()
}
The view has no direct SDK calls — it only reads model.state and invokes the model's methods. When signed out it shows the Login button; while an operation is in flight it shows a ProgressView; once signed in it greets the user and offers User Settings and Logout.
Checkpoint
Run your app now. It should launch and settle on the Login screen. Tapping Login will attempt to open the authentication page — but it won't return to your app yet. We'll register the redirect URI scheme next.
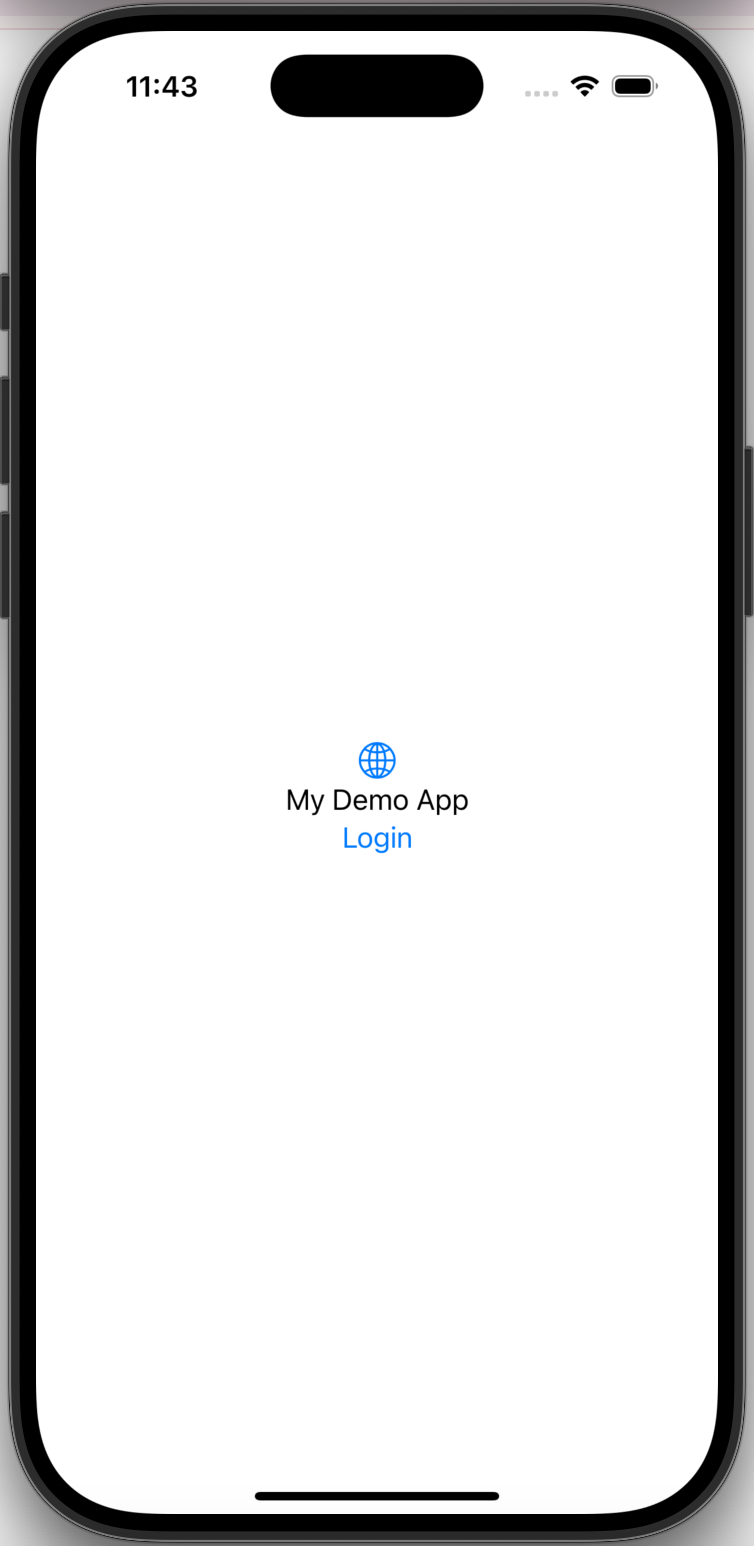
Step 5: Register the URI Scheme for the Redirect URI
For Authany to redirect back into your app after authentication, register the custom URL scheme — the part of the redirect URI before ://. For our redirect URI com.example.authgeardemo://host/path, the scheme is com.example.authgeardemo.
Open your project's Info.plist or project settings UI in Xcode and add the following:
Navigate to Targets > {Your project} > Info and expand the URL Types section.
Add a new URL scheme with the following details:
Identifier: CFBundleURLTypes
URL Schemes: com.example.authgeardemo
Role: Editor
xcode project properties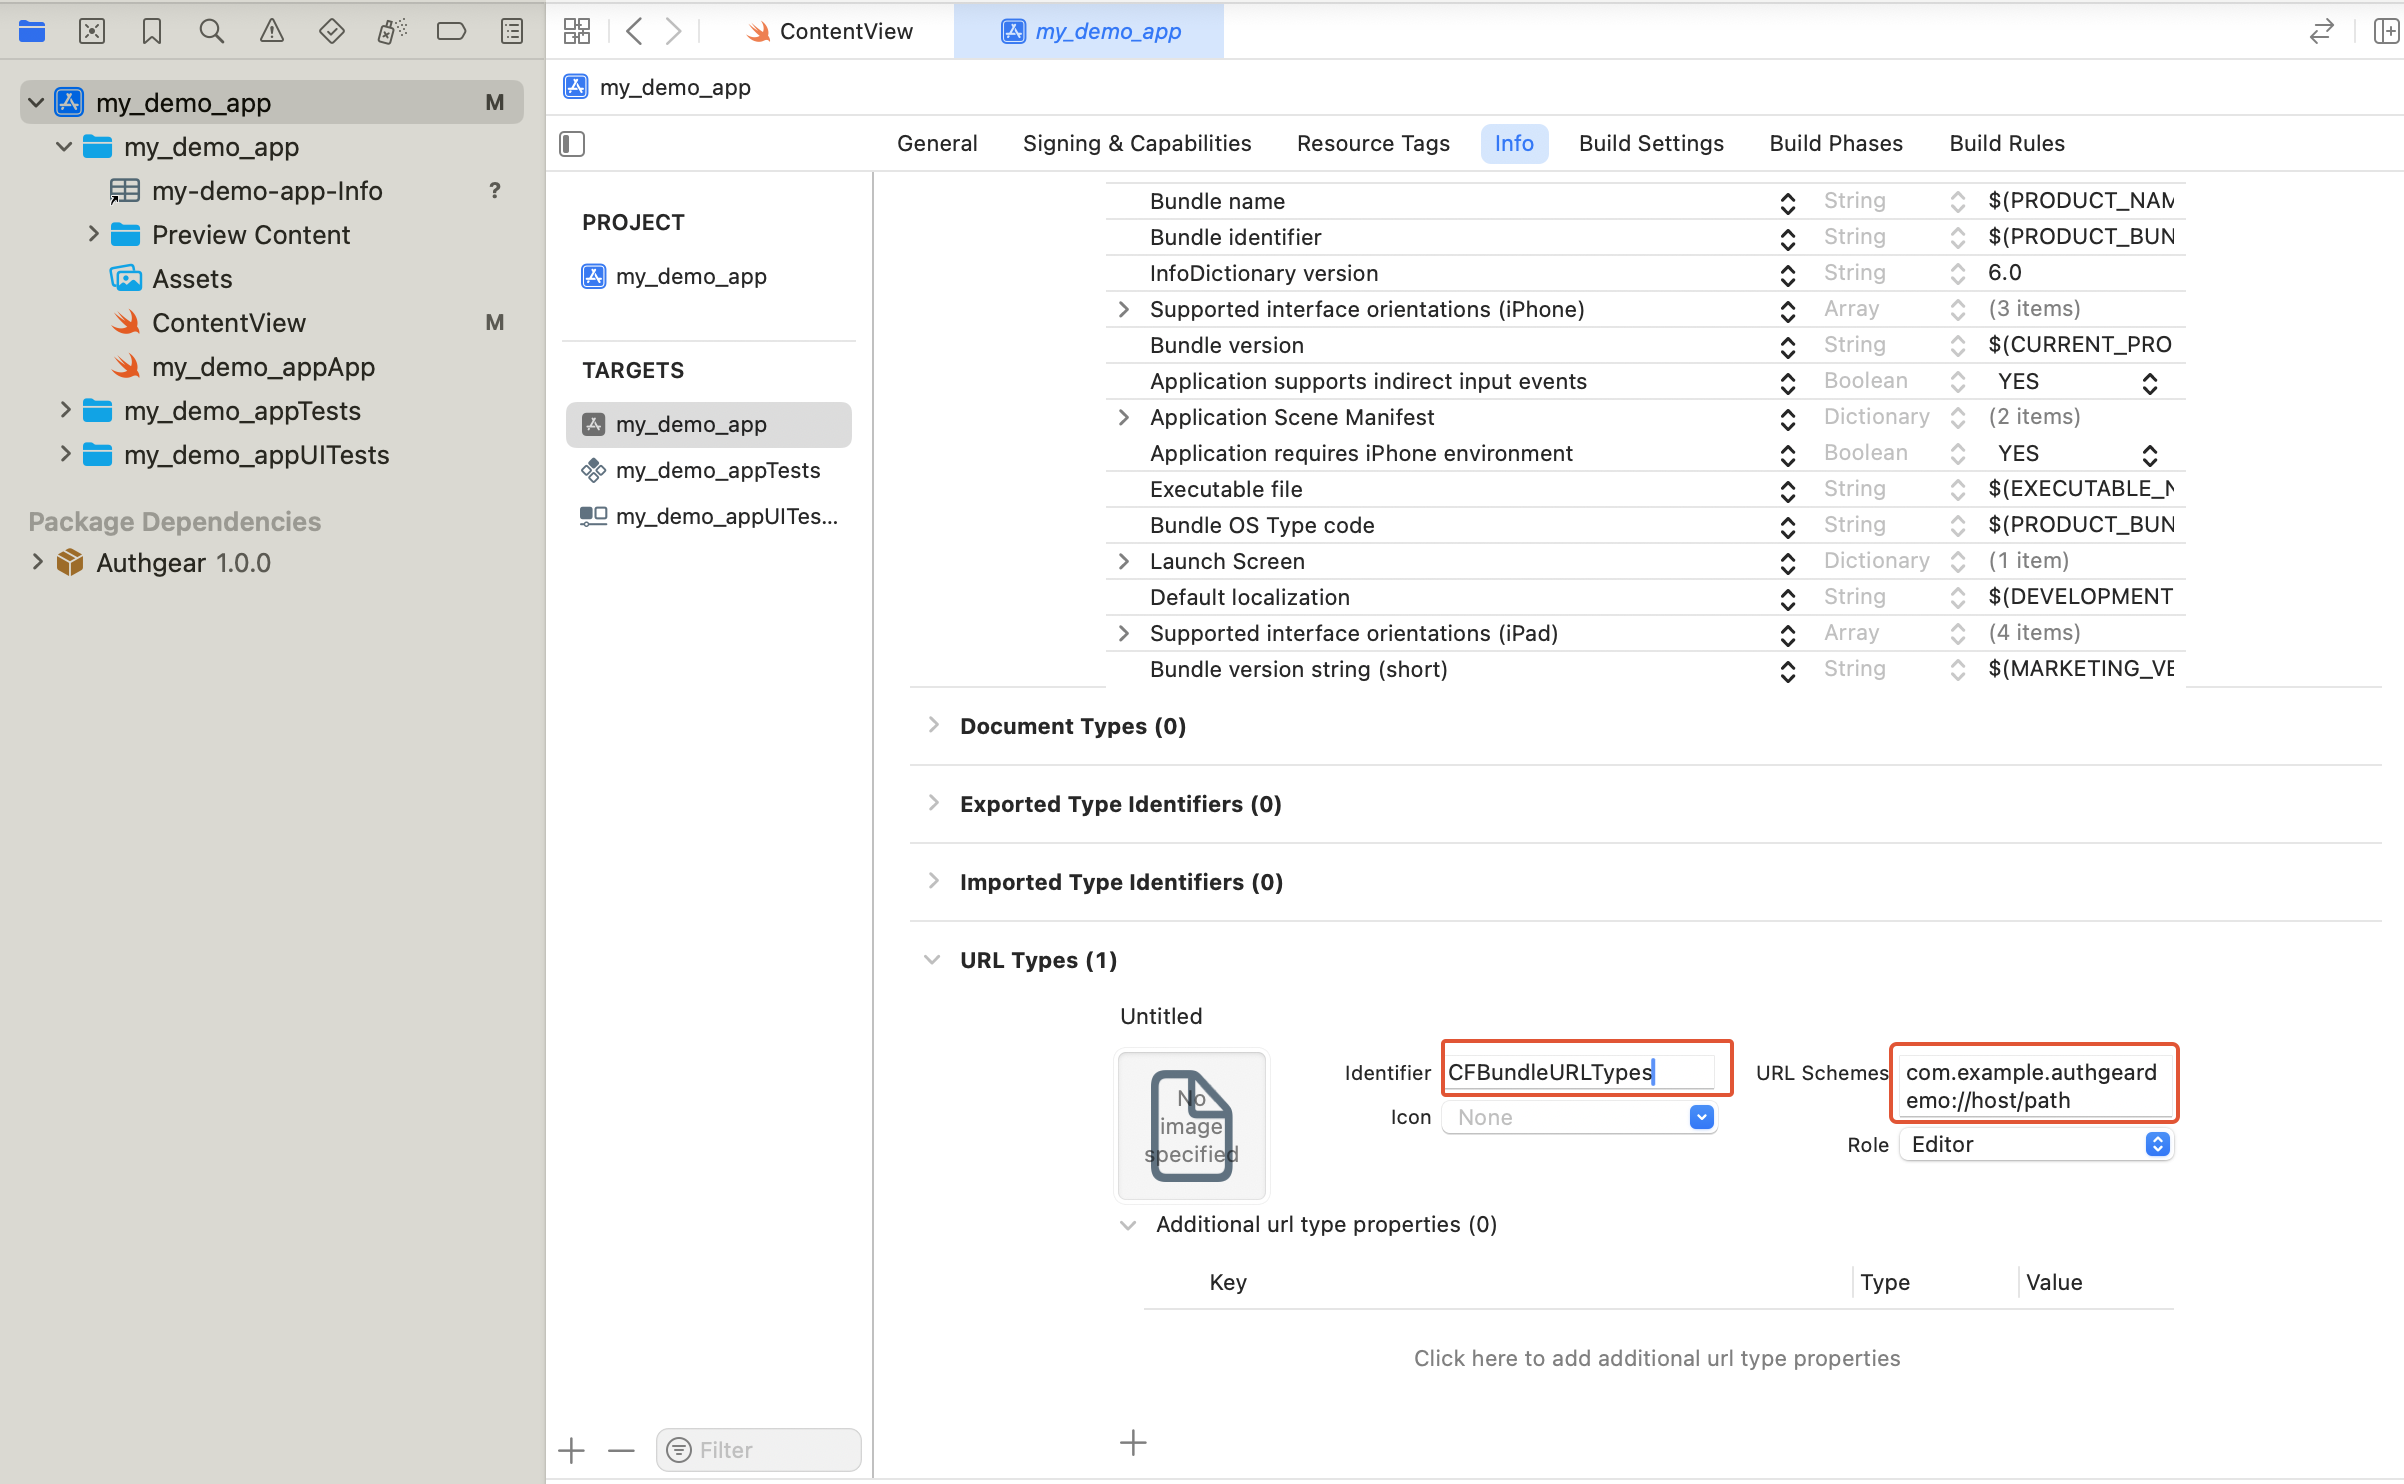
<?xml version="1.0" encoding="UTF-8"?>
<!DOCTYPE plist PUBLIC "-//Apple//DTD PLIST 1.0//EN" "http://www.apple.com/DTDs/PropertyList-1.0.dtd">
<plist version="1.0">
    <dict>
        <!-- Other entries -->
        <key>CFBundleURLTypes</key>
        <array>
            <dict>
                <key>CFBundleTypeRole</key>
                <string>Editor</string>
                <key>CFBundleURLName</key>
                <string>CFBundleURLTypes</string>
                <key>CFBundleURLSchemes</key>
                <array>
                    <string>com.example.authgeardemo</string>
                </array>
            </dict>
        </array>
    </dict>
</plist>
Warning
Register the bare scheme com.example.authgeardemo in CFBundleURLSchemes — not the full redirect URI com.example.authgeardemo://host/path. CFBundleURLSchemes expects only the scheme (the text before ://). The full redirect URI is what you register in the Authany Portal and pass to authenticate(redirectURI:).
Step 6: Run and test
Run your app again and try logging in. Because the redirect scheme is now registered, Authany will redirect back to your app after authentication and the view will switch to the signed-in screen.
Try the full flow:
- Login — completes authentication and shows "Welcome user <sub>".
- User Settings — opens Authany's pre-built settings page.
- Logout — ends the session and returns to the Login screen.
If configuration fails (for example, a wrong endpoint) or authentication errors out, the .alert you added in Step 4 surfaces the message instead of failing silently.
Understanding session state
You may want to know whether the user has logged in (for example, to show a Login button only when they haven't).
The sessionState reflects the user's logged-in state in the SDK's local state. Even if sessionState is .authenticated, the session may be invalid if it was revoked remotely. Hence, after initializing the SDK, call fetchUserInfo to update sessionState as soon as it is proper to do so — which is exactly what configure() → refreshCurrentUser() does in the model above.
The value of sessionState can be .unknown, .noSession or .authenticated. Initially it is .unknown. After a call to authgear.configure, it becomes .authenticated if a previous session was found, or .noSession if no such session existed.
Using the Access Token in HTTP Requests
Call refreshAccessTokenIfNeeded every time before using the access token; it checks and makes a network call only if the access token has expired. Then include the access token in the Authorization header of your request. As with the other SDK calls, you can bridge the completion handler into async/await with a continuation:
func callProtectedAPI() async throws {
    try await withCheckedThrowingContinuation { (continuation: CheckedContinuation<Void, Error>) in
        authgear.refreshAccessTokenIfNeeded { result in
            continuation.resume(with: result)
        }
    }

    // The access token is ready to use. It can be empty if the user is not
    // logged in or the session is invalid.
    guard let accessToken = authgear.accessToken else {
        // The user is not logged in, or the token is expired.
        return
    }

    // Example only — use your own networking library.
    var urlRequest = URLRequest(url: URL(string: "YOUR_SERVER_URL")!)
    urlRequest.setValue("Bearer \(accessToken)", forHTTPHeaderField: "authorization")
    // ... continue making your request
}
Next steps
To protect your application server from unauthorized access. You will need to integrate your backend with Authany.
iOS SDK Reference
For detailed documentation on the iOS SDK, visit iOS SDK Reference.