Angular
Authany helps you add user logins to your Angular apps. It provides prebuilt login page and user settings page that accelerate the development.
Follow this  15 minutes tutorial to create a simple app using Angular with Authany SDK.
Note
Check out and clone the Sample Project on GitHub.
Note
This tutorial targets Angular 17 and above, which use standalone components and bootstrap the app without NgModule. The sample project is built with Angular 22 (standalone, zoneless change detection). If you are on an older Angular version that still uses NgModule, adapt the steps accordingly.
Table of Content
- Setup Application in Authany
- Create a simple Angular project
- Install Authany SDK to the project
- Implement User Service
- Implement the Auth Redirect page
- Add a Login button
- Show the user information
- Add a Logout button
- Open User Settings
- Calling an API
Setup Application in Authany
Signup for an account in https://manage.authany.com/ and create a Project.
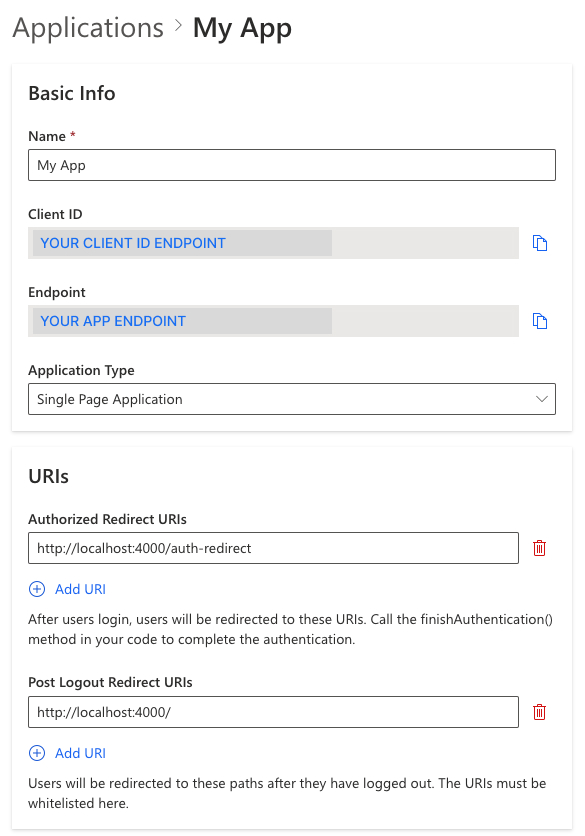
After that, we will need to create an Application in the Project Portal.
Create an application in the Portal
- Go to Applications on the left menu bar.
- Click ⊕Add Application in the top tool bar.
- Input the name of your application, e.g. "MyAwesomeApp".
- Select Single Page Application as the application type
- Click "Save" to create the application
Configure Authorize Redirect URI
The Redirect URI is a URL in you application where the user will be redirected to after login with Authany. In this path, make a finish authentication call to complete the login process.
For this tutorial, add http://localhost:4000/auth-redirect to Authorize Redirect URIs.
Configure Post Logout Redirect URI
The Post Logout Redirect URI is the URL users will be redirected after they have logged out. The URL must be whitelisted.
For this tutorial, add http://localhost:4000/ to Post Logout Redirect URIs.
Save the configuration before next steps.
Step 1: Create a simple Angular project
Here are some recommended steps to scaffold an Angular project. You can skip this part if you are adding Authany to an existing project. See Step 2: Install Authany SDK to the project in the next section.
Install the Angular CLI
To install the Angular CLI, open a terminal window and run the following command:
Note
For Windows clients, please find your reference in https://angular.dev/tools/cli/setup-local for more information on installing the Angular CLI.
Create initial workspace
Run the following cli command to create a new workspace and initial app called my-app with routing enabled.
# Create a workspace called my-app
ng new my-app --routing --defaults
# Move into the project directory
cd my-app
On Angular 17+, this scaffolds a standalone application. The important generated files are:
src/main.ts— bootstraps the app withbootstrapApplication(AppComponent, appConfig)src/app/app.config.ts— the application providers (this is where we will configure Authany and the router)src/app/app.routes.ts— the route definitions
Note
Newer versions of the Angular CLI generate component and service files without the .component / .service suffix (for example app.ts and class App instead of app.component.ts and class AppComponent). This tutorial and the sample project use the suffixed names. The code is identical either way — just match the file names and class names your CLI generated.
Edit script for launching the app
In the package.json file, edit the start script in the script section
The start script run the app in development mode on port 4000 instead of the default one.
Edit the app.component.html file
By default, the Angular CLI generated an initial application for us, but for simplicity, we recommend to modify some of these files to scratch.
In the src/app/app.component.html file, remove all the lines and add the following line:
Run your initial app
Run npm start now to run the project and you will see "Hello world" on http://localhost:4000.
Step 2: Install Authany SDK to the project
Run the following command within your Angular project directory to install the Authany Web SDK
Authany must be configured before any other SDK call (for example finishAuthentication() or fetchUserInfo()), and configuration is asynchronous. The cleanest way to guarantee this in Angular is to run authgear.configure() during app initialization, so the app only renders after Authany is ready.
In src/app/app.config.ts, register an app initializer that calls configure:
// src/app/app.config.ts
import {
  ApplicationConfig,
  provideAppInitializer,
  provideBrowserGlobalErrorListeners,
} from '@angular/core';
import { provideRouter } from '@angular/router';
import authgear from '@authgear/web';

import { routes } from './app.routes';

export const appConfig: ApplicationConfig = {
  providers: [
    provideBrowserGlobalErrorListeners(),
    provideRouter(routes),
    // Configure Authgear before the app renders. configure() must complete
    // before any other SDK call, so blocking bootstrap here avoids a race in
    // which the redirect page or home page runs before the SDK is ready.
    provideAppInitializer(async () => {
      try {
        await authgear.configure({
          endpoint: '<your_app_endpoint>',
          clientID: '<your_client_id>',
          sessionType: 'refresh_token',
        });
      } catch (e) {
        // Don't block bootstrap if Authgear is unreachable; the app will
        // render in the logged-out state and login can be retried.
        console.error(e);
      }
    }),
  ],
};
The Authany container instance takes endpoint and clientID as parameters. They can be obtained from the application page created in Setup Application in Authany.
Because the initializer is awaited, by the time any route renders Authany is ready to use.
Note
Run npm start now and you should see a page with "Hello World" and no error message in the console if Authany SDK is configured successfully
Step 3: Implement the User Service
Since we want to reference the logged in state in anywhere of the app, let's put the state in a service with user.service.ts in the /src/app/services/ folder.
In user.service.ts, it will have an isLoggedIn state. The state is auto updated using the onSessionStateChange callback, which is stored in the delegate of the local SDK container. We expose the state as an Angular signal so the UI updates reactively (this also works with zoneless change detection, the default on newer Angular versions).
// src/app/services/user.service.ts
import { Injectable, signal } from '@angular/core';
import authgear from '@authgear/web';

@Injectable({
  providedIn: 'root',
})
export class UserService {
  // By default the user is not logged in
  readonly isLoggedIn = signal(false);

  constructor() {
    // When the sessionState changed, logged in state will also be changed
    authgear.delegate = {
      onSessionStateChange: (container) => {
        // sessionState is now up to date
        // value of sessionState can be "NO_SESSION" or "AUTHENTICATED"
        const sessionState = container.sessionState;
        this.isLoggedIn.set(sessionState === 'AUTHENTICATED');
      },
    };
  }
}
The onSessionStateChange delegate fires while configure() runs, so the UserService must be instantiated before configure() — otherwise it would miss the initial state of an already-authenticated user. Update the app initializer in src/app/app.config.ts to inject the service first:
// src/app/app.config.ts
import { inject, provideAppInitializer } from '@angular/core';
import authgear from '@authgear/web';
import { UserService } from './services/user.service';

// ...

    provideAppInitializer(async () => {
      // Instantiate UserService first so its onSessionStateChange delegate is
      // registered before configure() runs and can observe the initial state.
      inject(UserService);
      try {
        await authgear.configure({
          endpoint: '<your_app_endpoint>',
          clientID: '<your_client_id>',
          sessionType: 'refresh_token',
        });
      } catch (e) {
        console.error(e);
      }
    }),
Step 4: Implement the Auth Redirect
Next, we will add an "auth-redirect" page for handling the authentication result after the user have been authenticated by Authany.
Create the auth-redirect component using the following command:
We will inject the router to navigate after the redirect is handled.
Call the Authany finishAuthentication() function in the Auth Redirect component to send a token back to Authany server in exchange for access token and refresh token. Don't worry about the technical jargons, finishAuthentication() will do all the hard work for you and and save the authentication data.
When the authentication is finished, the isLoggedIn state from the UserService will automatic set to true. Finally, navigate back to root (/) which is our Home page.
The final auth-redirect.component.ts will look like this
// src/app/auth-redirect/auth-redirect.component.ts
import { Component, OnInit, inject } from '@angular/core';
import { Router } from '@angular/router';
import authgear from '@authgear/web';

@Component({
  selector: 'app-auth-redirect',
  templateUrl: './auth-redirect.component.html',
  styleUrl: './auth-redirect.component.css',
})
export class AuthRedirectComponent implements OnInit {
  private readonly router = inject(Router);

  ngOnInit(): void {
    authgear
      .finishAuthentication()
      .catch((e) => console.error(e))
      .then(() => {
        this.router.navigate(['']);
      });
  }
}
Step 5: Add Routes to the App
Next, we will add a "Home" page . Create a home component using the following command:
Then import HomeComponent and AuthRedirectComponent as routes. We can add those routes in the app.routes.ts file that was generated with the workspace:
// src/app/app.routes.ts
import { Routes } from '@angular/router';
import { HomeComponent } from './home/home.component';
import { AuthRedirectComponent } from './auth-redirect/auth-redirect.component';

export const routes: Routes = [
  { path: '', component: HomeComponent },
  { path: 'auth-redirect', component: AuthRedirectComponent },
];
The router is already provided in app.config.ts via provideRouter(routes) (added in Step 2). Make sure the root component renders the routed component by importing RouterOutlet and using it in the template.
// src/app/app.component.ts
import { Component } from '@angular/core';
import { RouterOutlet } from '@angular/router';

@Component({
  selector: 'app-root',
  imports: [RouterOutlet],
  templateUrl: './app.component.html',
  styleUrl: './app.component.css',
})
export class AppComponent {}
Replace the lines in src/app/app.component.html with the following:
The file structure should now look like
src
├── (...)
├── main.ts
└── app
    ├── app.config.ts
    ├── app.routes.ts
    ├── app.component.ts
    ├── app.component.html
    ├── (...)
    ├── auth-redirect
    │   ├── auth-redirect.component.ts
    │   ├── auth-redirect.component.html
    │   └── (...)
    ├── home
    │   ├── home.component.ts
    │   ├── home.component.html
    │   └── (...)
    └── services
        └── user.service.ts
Step 6: Add a Login button
First we will import the Authany dependency and inject the UserService in home.component.ts. Then add the startLogin method which will call startAuthentication(options). This will redirect the user to the login page.
// src/app/home/home.component.ts
import { Component, inject } from '@angular/core';
import { UserService } from '../services/user.service';
import authgear, { PromptOption } from '@authgear/web';

@Component({
  selector: 'app-home',
  templateUrl: './home.component.html',
  styleUrl: './home.component.css',
})
export class HomeComponent {
  readonly user = inject(UserService);

  startLogin(): void {
    authgear
      .startAuthentication({
        redirectURI: 'http://localhost:4000/auth-redirect',
        prompt: PromptOption.Login,
      })
      .then(
        () => {
          // started authorization, user should be redirected to Authgear
        },
        (err) => {
          // failed to start authorization
          console.error(err);
        }
      );
  }
}
Note
prompt takes a PromptOption enum value (for example PromptOption.Login) in @authgear/web v5 and above. Importing and using the enum keeps the call type-safe.
Then you can add a button which will trigger the startLogin method in home.component.html:
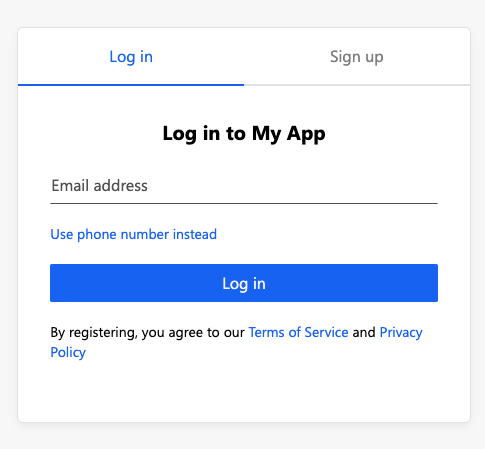
You can now run npm start and you will be redirected to the Authany Login page when you click the Login button.
Step 7: Show the user information
The Authany SDK helps you get the information of the logged in users easily.
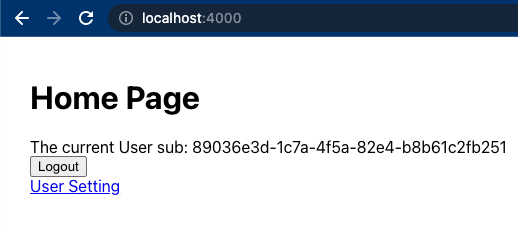
In the last step, the user is successfully logged in so let's try to print the user ID (sub) of the user in the Home page.
In home component, we will add a simple Loading splash and a greeting message printing the Sub ID. We will add two conditional elements such that they are only shown when user is logged in. We can also change the login button to show only if the user is not logged in.
Make use of isLoggedIn from the UserService to control the components on the page. Fetch the user info by fetchUserInfo() and access its sub property. We store the loading and greeting state as signals so the template stays reactive.
// src/app/home/home.component.ts
import { Component, OnInit, inject, signal } from '@angular/core';
import { UserService } from '../services/user.service';
import authgear, { PromptOption } from '@authgear/web';

@Component({
  selector: 'app-home',
  templateUrl: './home.component.html',
  styleUrl: './home.component.css',
})
export class HomeComponent implements OnInit {
  readonly user = inject(UserService);

  readonly isLoading = signal(false);
  readonly greetingMessage = signal('');

  async updateGreetingMessage() {
    this.isLoading.set(true);
    try {
      if (this.user.isLoggedIn()) {
        const userInfo = await authgear.fetchUserInfo();
        this.greetingMessage.set('The current User sub: ' + userInfo.sub);
      }
    } finally {
      this.isLoading.set(false);
    }
  }

  ngOnInit(): void {
    this.updateGreetingMessage().catch((e) => {
      console.error(e);
    });
  }

  startLogin(): void {
    authgear
      .startAuthentication({
        redirectURI: 'http://localhost:4000/auth-redirect',
        prompt: PromptOption.Login,
      })
      .then(
        () => {
          // started authorization, user should be redirected to Authgear
        },
        (err) => {
          // failed to start authorization
          console.error(err);
        }
      );
  }
}
In the home.component.html, use the new @if control flow and read each signal by calling it:
<h1>Home Page</h1>
@if (isLoading()) {
  <span>Loading</span>
}
@if (greetingMessage()) {
  <span>{{ greetingMessage() }}</span>
}
@if (!user.isLoggedIn()) {
  <div>
    <button type="button" (click)="startLogin()">Login</button>
  </div>
}
Run the app again, the User ID (sub) of the user should be printed on the Home page.
Step 8: Add a Logout button
Finally, let's add an Logout button when user is logged in.
In home.component.html, we will add a conditional element in the markup:
And add the logout method:
logout(): void {
  authgear
    .logout({
      redirectURI: 'http://localhost:4000/',
    })
    .then(
      () => {
        this.greetingMessage.set('');
      },
      (err) => {
        console.error(err);
      }
    );
}
Run the app again, we can now logout by clicking the logout button.
Step 9: Open User Settings
Authany provide a built-in UI for the users to set their attributes and change security settings.
Use the open function to open the setting page at <your_app_endpoint>/settings
In home.component.html append a conditional link to the logout button section.
@if (user.isLoggedIn()) {
  <div>
    <button type="button" (click)="logout()">Logout</button>
    <br />
    <a target="_blank" rel="noreferrer" (click)="userSetting($event)" href="#">
      User Setting
    </a>
  </div>
}
And add the userSetting method (note the added Page import):
import authgear, { Page, PromptOption } from '@authgear/web';

async userSetting(event: MouseEvent) {
  event.preventDefault();
  event.stopPropagation();
  await authgear.open(Page.Settings);
}
This the resulting home.component.ts:
// src/app/home/home.component.ts
import { Component, OnInit, inject, signal } from '@angular/core';
import { UserService } from '../services/user.service';
import authgear, { Page, PromptOption } from '@authgear/web';

@Component({
  selector: 'app-home',
  templateUrl: './home.component.html',
  styleUrl: './home.component.css',
})
export class HomeComponent implements OnInit {
  readonly user = inject(UserService);

  readonly isLoading = signal(false);
  readonly greetingMessage = signal('');

  async updateGreetingMessage() {
    this.isLoading.set(true);
    try {
      if (this.user.isLoggedIn()) {
        const userInfo = await authgear.fetchUserInfo();
        this.greetingMessage.set('The current User sub: ' + userInfo.sub);
      }
    } finally {
      this.isLoading.set(false);
    }
  }

  ngOnInit(): void {
    this.updateGreetingMessage().catch((e) => {
      console.error(e);
    });
  }

  startLogin(): void {
    authgear
      .startAuthentication({
        redirectURI: 'http://localhost:4000/auth-redirect',
        prompt: PromptOption.Login,
      })
      .then(
        () => {
          // started authorization, user should be redirected to Authgear
        },
        (err) => {
          // failed to start authorization
          console.error(err);
        }
      );
  }

  logout(): void {
    authgear
      .logout({
        redirectURI: 'http://localhost:4000/',
      })
      .then(
        () => {
          this.greetingMessage.set('');
        },
        (err) => {
          console.error(err);
        }
      );
  }

  async userSetting(event: MouseEvent) {
    event.preventDefault();
    event.stopPropagation();
    await authgear.open(Page.Settings);
  }
}
This is the resulting home.component.html:
<h1>Home Page</h1>
@if (isLoading()) {
  <span>Loading</span>
}
@if (greetingMessage()) {
  <span>{{ greetingMessage() }}</span>
}
@if (!user.isLoggedIn()) {
  <div>
    <button type="button" (click)="startLogin()">Login</button>
  </div>
}
@if (user.isLoggedIn()) {
  <div>
    <button type="button" (click)="logout()">Logout</button>
    <br />
    <a target="_blank" rel="noreferrer" (click)="userSetting($event)" href="#">
      User Setting
    </a>
  </div>
}
Next steps, Calling an API
To access restricted resources on your backend application server, the HTTP requests should include the access token in their Authorization headers. The Web SDK provides a fetch function which automatically handle this, or you can get the token with authgear.accessToken.
Option 1: Using fetch function provided by Authany SDK
Authany SDK provides the fetch function for you to call your application server. This fetch function will include the Authorization header in your application request, and handle refresh access token automatically. The authgear.fetch implements fetch.
authgear
    .fetch("YOUR_SERVER_URL")
    .then(response => response.json())
    .then(data => console.log(data));
Option 2: Add the access token to the HTTP request header
You can get the access token through authgear.accessToken. Call refreshAccessTokenIfNeeded every time before using the access token, the function will check and make the network call only if the access token has expired. Include the access token into the Authorization header of the application request.
authgear
    .refreshAccessTokenIfNeeded()
    .then(() => {
        // access token is ready to use
        // accessToken can be string or undefined
        // it will be empty if user is not logged in or session is invalid
        const accessToken = authgear.accessToken;

        // include Authorization header in your application request
        const headers = {
            Authorization: `Bearer ${accessToken}`
        };
    });