Authentication Flow API
Build your own custom UI for login, signup, and more powered by the Authentication Flow API.
By default, when you set up an Authany project, it makes use of the regular AuthUI offered by Authany. Although AuthUI offers many customization options such as the ability to change the theme and color or add your brand logo to authentication pages, you might have more needs. With the Authentication Flow API, you can build your own authentication UI from the ground up, and using your preferred programming language and tool.
What is the Authentication Flow API?
The Authentication Flow API is an REST HTTP API that you can use to create and run an authentication flow. You can use this API to create your own custom UI for pages like login, signup, account recovery, 2FA, and more.
To use the API on its own you make an HTTP request to one of the valid endpoints as shown below:
Endpoint: {your-authgear-project-domain}/api/v1/authentication_flows
Request method: POST
Request header:
All requests to the API should include the above header.
Request body:
The following is a sample of the response you would get from the Authentication Flow API for the above request:
{
    "result": {
        "state_token": "authflowstate_VGHZ8SBCKGZK2KW84TCAKWGM8QZH0B69",
        "type": "login",
        "name": "default",
        "action": {
            "type": "identify",
            "data": {
                "options": [
                    {
                        "identification": "phone"
                    },
                    {
                        "identification": "email"
                    },
                    {
                        "identification": "oauth",
                        "oauth_provider_type": "google",
                        "oauth_provider_alias": "google"
                    }
                ]
            }
        }
    }
}
The above response means you've successfully started a new login flow using the API.
Note
If the browser already has an active Authany session and your flow config enables it, the options array can also include a select_account entry. This lets the user continue as their existing account without re-entering credentials. See Single Sign-On Continuation with Custom UI.
To continue and finish the authentication flow, you can send the value for state_token from the above response in your next HTTP request to the api/v1/authentication_flows/states/input endpoint like the example shown below:
Endpoint: {your-authgear-project-domain}/api/v1/authentication_flows/states/input
Request method: POST
To help you understand the structure of the Authentication Flow API HTTP(S) request, here is an example of an actual request in Postman:
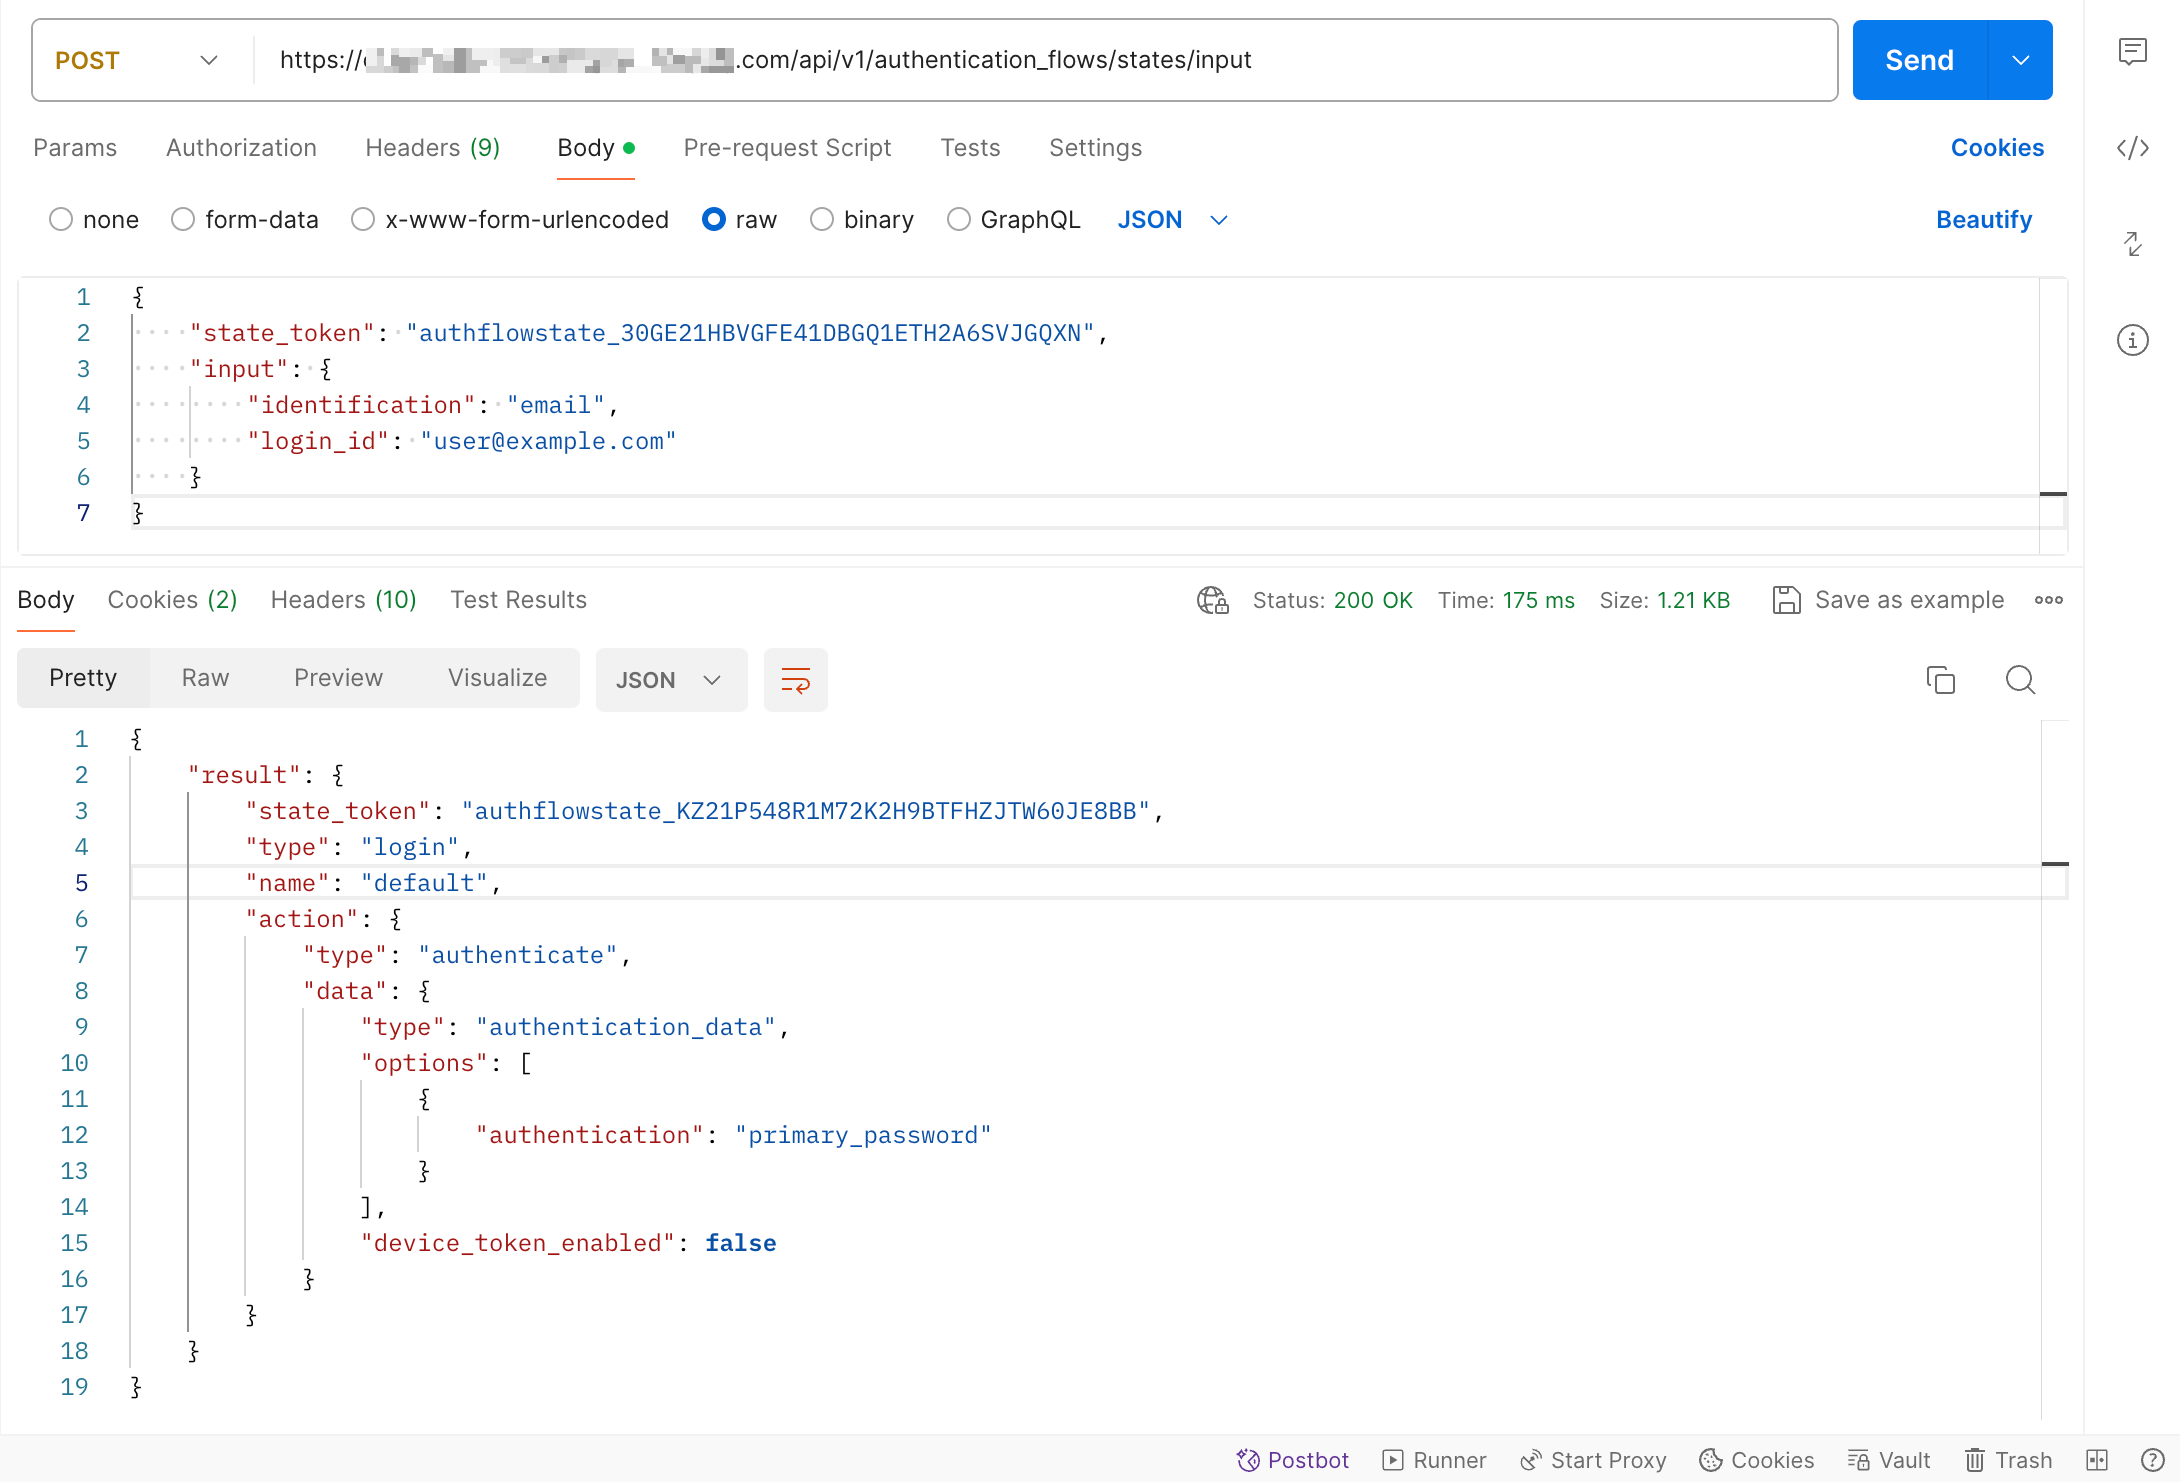
Request body:
{
    "state_token": "authflowstate_VGHZ8SBCKGZK2KW84TCAKWGM8QZH0B69",
    "input": {
        "identification": "email",
        "login_id": "user@example.com"
    }
}
In this second request (or second step of the authentication flow), we use the state_token from the response to the previous request in the request body to continue the authentication flow. The request body includes the input field that passes the type of identification the user will provide (for example, email) and the login_id which is the actual value for the user's identification.
The response to the above request should look like this:
{
    "result": {
        "state_token": "authflowstate_ABCJVB0IJKLQ2S1K2G34RX56R1C1E789",
        "type": "login",
        "name": "default",
        "action": {
            "type": "authenticate",
            "data": {
                "type": "authentication_data",
                "options": [
                    {
                        "authentication": "primary_password"
                    }
                ],
                "device_token_enabled": false
            }
        }
    }
}
You may send more requests just like this second request depending on the number of steps required for your specific authentication flow. For example, to complete the login authentication flow, send another request with the the authenticator (password) like this:
{
    "state_token": "authflowstate_ABCJVB0IJKLQ2S1K2G34RX56R1C1E789",
    "input": {
        "authentication": "primary_password",
        "password": "sup3r$tr0ngpa$$"
    }
}
To use the Authentication Flow API to build your custom UI, you need to configure a Custom UI URI in the Authany portal. This URI should point to your custom authentication page.
For more details about the Authentication Flow API endpoints, inputs, response, and more visit the API reference page.
How the Authentication Flow API Works
The following flowchart shows the steps in a simple Authentication Flow API implementation:
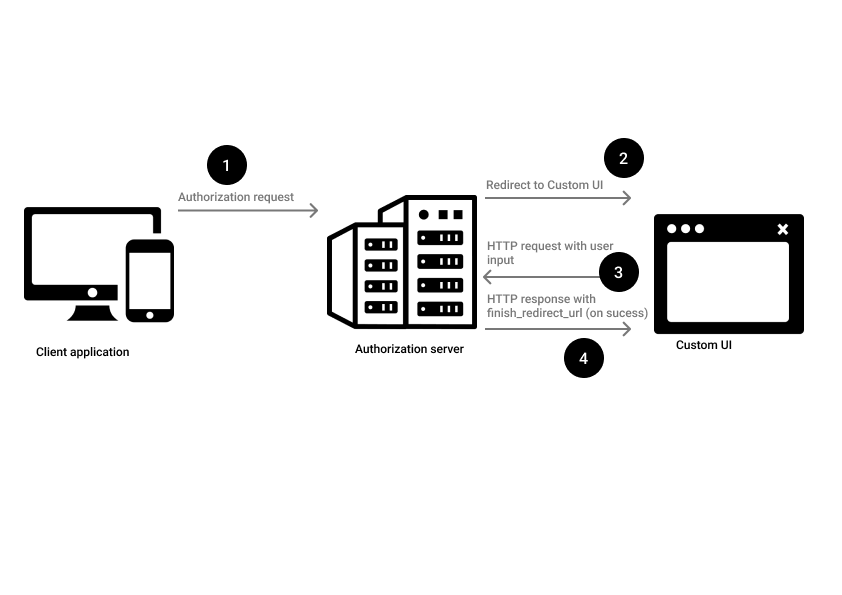
flowchart showing how authentication flow API works
Step 1: Make Authorization Request
When you use the authentication flow API to power your custom UI, the authentication flow for your app will start with your app sending an authorization request to Authany's authorization server as shown in step 1 in the figure above.
Step 2: Redirect to Custom UI
If you have Authentication Flow API enabled and a Custom UI URI set for your Authany App, the authorization server will redirect your users to the custom UI as shown in step 2 above.
The redirect includes query parameters such as client_id, redirect_uri, and x_ref that your custom UI should forward back to the API via url_query. If the authorization request carries login_hint or id_token_hint, those are forwarded on the redirect too. Your custom UI can read them to pre-fill an identifier field, or to decide whether to offer Single Sign-On Continuation.
Step 3: Make HTTP Requests to Authentication Flow API Endpoints
In your custom UI, implement the code that interacts with the Authentication Flow API (using HTTP requests) as demonstrated in step 3 of the above figure.
Step 4: Finish the Authentication Flow
In an authentication flow with multiple steps, the custom UI and Authany's authentication server may perform steps 3 and 4 in the above figure multiple times. In such cases, only the final response at the end of the authentication flow will include a finish_redirect_url.
You must redirect your user to the finish_redirect_url to complete the authentication flow.
To dive deeper into how to use the Authentication Flow API to power your custom UI, check out the following tutorials for your preferred programming languages and frameworks.